

| PROCEDURE I-2-1: OBSERVE AND CATEGORIZE SOIL COLOR | Page 44 |
| PROCEDURE I-3-1: EXAMINE SOIL SPECIMENS UNDER MAGNIFICATION | Page 57 |
| PROCEDURE I-2-3: DETERMINE SOIL DENSITY | Page 46 |
| PROCEDURE I-2-3: DETERMINE SOIL SETTLING TIME | Page 48 |
Soil Analysis
What you will need
|
|
Experiment Guide
OBSERVE AND CATEGORIzE SOIL COLOR
1. Place your reaction plate on a sheet of white paper, and fill a row of wells nearly to the top with portions of your questioned specimen.
2. Compare the color of the questioned specimen with the other soil samples, and record the name of the closest soil sample in your lab notebook.
3. Fill an adjacent row of five wells with your known specimens noting which well contains which known sample.
4. Under even daylight lighting, compare Known #1 (K1) against the questioned specimen (Q1) to determine how closely it matches the unknown specimen. Record a short description (for example, “match,” “close match,” or “no match”) in your lab notebook.
5. Repeat step 4 for K2 through K5, and record your observations in your lab notebook.
EXAMINE SOIL SPECIMENS UNDER MAGNIFICATION
1. If you have not already done so, put on your splash goggles, gloves, and protective clothing. (In this lab session, the purpose of these safety items is less to protect you from the specimens than to protect the specimens from you. Forensic technicians and scientists always wear protective gear to avoid contaminating specimens.)
2. Label six well slides Q1 and K1 through K5, and transfer small amounts of the corresponding soil specimens to each slide. You needn’t fill the well completely. Ideally, you want just enough soil in each well to provide a single layer of particles.
3. Examine each specimen with the magnifier or at low magnification under a stereo microscope. Sometimes, similarities and differences between specimens are more clearly visible at lower magnification. At higher magnification, you may not be able to see the forest for the trees.
4. With the compound microscope set to 40X magnification, observe the questioned soil specimen. Record detailed observations for that specimen in your lab notebook.
DETERMINE SOIL DENSITY
1. Weigh out about 50 g of the dry questioned specimen and record its mass in your lab notebook.
2. Fill the 100 mL graduated cylinder to 50ml with water, using a disposable pipette to add water dropwise until the cylinder contains as close as possible to 50ml. Record this initial volume as accurately as possible in your lab notebook.
3. Using a folded sheet of paper, carefully transfer the weighed questioned soil specimen to the graduated cylinder. Make sure as little as possible of the soil specimen adheres to the walls of the cylinder above the liquid level. Your goal is to make sure all of the soil is immersed in the liquid. If you get air bubbles under the surface of the liquid, tap the cylinder or use the stirring rod to eliminate them.
4. Determine the new liquid volume as accurately as possible and record it in your lab notebook.
5. Subtract the initial volume from the final volume to determine the volume of liquid displaced by the specimen. For example, if the graduated cylinder initially contained 50.4ml and the final volume was 84.2ml, calculate the displaced volume as 84.2 – 50.4 = 33.8ml. Record the displacement volume in your lab notebook.
6. Divide the mass of the specimen by the volume displaced to determine the density of the specimen in grams per millilitre. For example, if your specimen mass was 50.39 g and the displacement volume was 33.8 ml, calculate the density of the specimen as 50.39 g / 33.8 mL = 1.49 g/ml. Record this value in your lab notebook.
7. Repeat steps 1 through 6 for each of the known specimens. Compare the density value you obtained for the questioned specimen with those you obtained for the known specimens to determine if one or more of the known specimens is similar in density.
DETERMINE SOIL SETTLING TIME
1. Label six test tubes Q1 and K1 through K5.
2. Transfer the questioned soil specimen to tube Q1 until the tube is about one quarter full. Tap the tube gently to settle the soil specimen.
3. Fill tube Q1 with tap water to about 1 cm from the rim.
4. Agitate the contents of the tube to suspend the soil in the liquid, and immediately note the start time in your lab notebook. Replace the tube in the rack and observe it as the soil settles.
5. When the soil appears to have settled completely, record the finish time in your lab notebook.
6. Subtract the start time from the end time to determine the elapsed time needed for the specimen to settle completely. Record that elapsed time in your lab notebook.
7. Repeat steps 2 through 6 for specimens K1 through K5. Unless your specimens settle very quickly, you’ll have time to start some or all of the remaining tubes before settling completes in the first tube.
8. Compare the settling times of the questioned specimen and the known specimens to determine if the questioned specimen is consistent with one or more of the known specimens.
Hair Analysis
What you will need
- human scalp hair
- Goggles
- Forceps
- Gloves
- Microscope (40X, 100X, and 400X)
- Coverslips
- Transfer sheets
Experiment guide
| PROCEDURE II-2-3: MICROSCOPIC EXAMINATION OF HUMAN SCALP HAIR | Page 89 |
| EXTRACT, ISOLATE AND VISUALIZE DNA. Lab-XI-3 | Page 387 |
| DNA ANALYSIS BY ELECTROPHORESIS. Lab-XI-4 | Page 393 |
PROCEDURE II-2-3: MICROSCOPIC EXAMINATION OF HUMAN SCALP HAIR
1 Place the hair specimen on the microscope stage and examine it at 100X. Record your observations in your lab notebook.
2.Increase magnification to 400X and examine the fine internal structure of the hair, noting any details that were not visible at 100X.
3. If you have the necessary equipment, shoot at least three images of the hair specimen: proximal tip, distal tip, and main body. Record the details, including the specimen number, by image filename for each image.
Fiber Analysis
What you will need
|
|
|
Experiments guide
| PROCEDURE II-7-2: MICROSCOPIC EXAMINATION OF FIBERS AND FABRICS | Page 130 |
| PROCEDURE II-6-2: TEST FIBER SPECIMENS BY BURNING | Page 111 |
MICROSCOPIC EXAMINATION OF FIBERS AND FABRICS
1. Label a microscope slide with a description of the specimen.
2. Carefully place the fiber onto the slide, then place a coverslip over the specimen and press it into place.
3. Place the specimen on the microscope stage and examine it at 100X, working from one end to the opposite end. (It doesn’t matter if you start from the proximal or distal end, but be consistent.) Record your observations in your lab notebook.
4. Increase magnification to 400X and examine the fine internal structure of the fiber, noting any details that were not visible at 100X.
5. Repeat steps 1 through 4 for each fiber specimen.
Cotton x50Cotton x200Cotton x1000
Polyester x50Polyester x200Polyester x1000
Cellulose x50Cellulose x200Cellulose 1000
Wool x50Wool x200Wool x1000
TEST FIBER SPECIMENS BY BURNING
1. If you have not done so already, put on your goggles, gloves, and protective clothing.
2.Grasp a fiber with your forceps. Burning even one fiber may provide a strong enough odor to be characterized by an experienced examiner.
2. Ignite the burner or lighter, and bring the fiber close to, but not into contact with, the flame. Does the fiber ignite, curl, or melt? Note your observations in your lab notebook in a table. Touch the end of the fiber to the flame. Does the fiber ignite immediately, slowly, or not at all? Does it simply melt, or is there no apparent change? If it burns, does it burn quickly or slowly, smoothly or with a sputtering flame? Note your observations in your lab notebook in the table.
3. Remove the fiber from the flame. Does it continue burning or extinguish? If it continues burning, is there an open flame or does it smolder with a glowing tip? Note your observations in your lab notebook in the table.
6. Repeat steps 2 through 5 for each known fiber (cellulose, cotton, polyester and wool)
7. Record your observations in your lab notebook. By comparing your results to those you obtained from the known specimens, attempt to identify the fabric type present in the unknown specimen.
| Fiber | Melts? | Curls | Burns? | Extinguishes? | Residuum |
| Cellulose | |||||
| Cotton | |||||
| Polyester | |||||
| Wool |
Plastic Analysis
Determine density by displacement
1. Place a weighing paper on your balance pan. Weigh your first plastic specimen and record its mass to the resolution of your balance in your lab notebook.
2. Use a pipette to transfer about 5 mL of water to the 10 mL graduated cylinder. Record the initial volume as accurately as possible in your lab notebook.
3. Carefully add the specimen to the graduated cylinder, making sure that you transfer all of the specimen to the cylinder and that the specimen is fully submerged in the liquid. Record the final volume as accurately as possible in your lab notebook.
4. Subtract the initial volume from the final volume to give the displaced volume, and enter that value in your lab notebook.
5. Divide the mass of the specimen by the displaced volume to determine the density of the specimen, and enter that value in your lab notebook.
6. Repeat steps 1 through 5 for each of your known and questioned plastic specimens.
Revealing Latent Fingerprints
Experiments guide
| PROCEDURE IV-1-1: DUSTING LATENT FINGERPRINTS | Page 178 | PROCEDURE IV-1-2: LIFTING DEVELOPED FINGERPRINTS | Page 179 |
DUSTING LATENT FINGERPRINTS
1. Wearing gloves and handling the questioned object by the edges or otherwise as required to avoid damaging any latent prints, observe the object by oblique lighting from the desk lamp or other directional light source. Record your observations in your lab notebook and note the approximate location of any latent prints that are made visible by the oblique lighting.
2. Place the object on a clean, flat surface with the suspected location of the latent prints accessible. (Don’t forget to wear gloves.)
3. Choose the dark or light fingerprint dusting powder, according to which will provide better contrast with the color of the surface.
4. Transfer a small amount of the dusting powder into the lid or work directly from the jar that contains the powder. Dip just the tips of the bristles of the brush into the powder so that a small amount of powder is retained by the bristles. Tap the brush gently to return excess powder to the container.
5. Under a strong light, use a circular, twirling motion to sweep the brush gently over the area to be treated allowing the bristles to just barely contact the surface. Continue depositing powder lightly until the latent fingerprint begins to develop, concentrating on that area as it becomes clearer where the latent prints are on the surface. If necessary, add more powder to the brush using the procedure in step 4. When the ridges begin to appear, change the direction of motion to follow the direction of the ridges. Once the fingerprint is developed clearly, stop dusting immediately. Beginners tend to overdevelop prints, which almost invariably causes loss of detail if not loss of the entire print.
6. Use the brush or a puffer bulb gently to remove any excess powder. (Okay, we admit it; we used our mouths to puff off excess powder, but that’s a horrible practice.) You can also use canned air if you do so extremely carefully, keeping the canned air nozzle far enough away from the dusted print to avoid blowing away everything, including the print. If you have a camera, shoot an image of the revealed print.
LIFTING DEVELOPED FINGERPRINTS
1. Choose one of your better developed prints. (If possible, shoot an image of a print before attempting to lift it. Accidents happen.)
2. Wearing gloves, lift the free end from the roll of lifting tape and smoothly pull out about 6 to 7.5 cm (2.5 to 3″) of tape from the roll. Don’t touch the sticky surface of the tape, and do not cut the tape from the roll.
3. Press the free end of the tape into contact with the surface, starting 5 to 6 cm from the nearest part of the dusted print. Make sure the tape adheres firmly to the surface.
4. Beginning at the free end, use your fingers to carefully press the tape down onto the surface, making sure that no air bubbles are trapped.
5. Continue pressing tape onto the surface, unrolling more as necessary, until you have covered the entire print with tape and continued for a couple of centimeters past the print.
6. Using the roll as a handle, peel the tape from the surface using one smooth motion. It helps to put one finger on the free end of the tape to make sure the tape doesn’t curl back on itself.
7. Stick the free end of the tape near one edge of a transfer card of a color that contrasts with powder you used to dust the print. Make sure the free end adheres tightly to the transfer card, and then carefully press the tape into contact with the transfer card, making sure to avoid air bubbles.
8. Cut the used tape from the roll and press the free end into contact with the transfer card. Label the transfer card with your initials, the date and time, and the object from which the print was lifted.
Fingerprint basics
Detecting Blood
Luminol
In a 1937 paper, the German chemist Walter Specht was the first to suggest the use of luminol for forensic blood detection. An aqueous or alcoholic solution of luminol and an oxidizer is catalyzed by the iron present in the hemoglobin component of blood to produce 3-aminophthalate (3-APA) in an excited state. Excited 3-APA molecules quickly return to their base state, emitting photons that are visible as a characteristic weak blue luminescence (not fluorescence; in the presence of iron or another catalyst, luminol emits light directly). Luminol is extraordinarily sensitive to the presence of blood, yielding positive results at dilutions as high as 100,000,000:1, and by some reports 1,000,000,000:1. Washing a surface thoroughly or even painting over a bloodstained surface often leaves sufficient traces of blood to yield a positive test with luminol. Unfortunately, this high sensitivity is accompanied by low selectivity. Many materials other than blood—including copper and other metals, laundry bleach, and many food items—yield positive luminol tests that are indistinguishable from positive results caused by actual blood. Interestingly, most body fluids other than blood do not react with luminol.
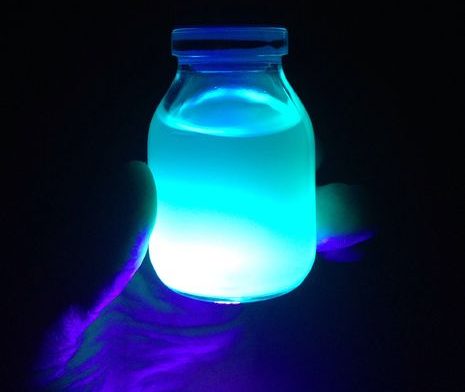
When luminol is used at a crime scene, cameras and luminescent markers are set up first, the crime scene is darkened, and then luminol solution is sprayed liberally on all surfaces that may have latent bloodstains. Walls are sprayed first to detect spatter patterns, followed by the ceiling to detect cast-off patterns, followed by the floor to detect footprints, drag marks, and so on. Luminol, at least in aqueous solution, is considered nondestructive.
What you will need
| Scales Potassium Hydroxide H2O2 Distilled water |
Luminol Pipete Synthetic blood Bottle |
Experiment guide
| EXTRACT, ISOLATE AND VISUALIZE DNA. Lab-XI-3 | Page 387 |
| DNA ANALYSIS BY ELECTROPHORESIS. Lab-XI-4 | Page 393 |
Procedure
1. Weigh out 2 g of potassium hydroxide and dissolve it with 35 mL of distilled water.
2. Weigh 0,3 g of luminol and add it to the solution.
3. Add 35 mL using 3% H2O2
4. In a dark place pour a drop of synthetic blood onto the solution. If it is classed as blood luminescence will be observed.
DNA Comparation
Students compare the genetic profile of the DNA corresponding to the blood detected and collected from the crime scene to the suspect´s in the DNA database.
In order to do so they have to compare the fourth row from the top of the genetic profile to the suspect’s DNA in the police database.
DNA registration
Forensic Drug Testing
TESTING SPECIMENS AGAINST PRESUMPTIVE REAGENTS
1. If you have not already done so, put on your splash goggles, gloves, and protective clothing.
2. Using a clean toothpick for each specimen, transfer a small amount of each of the known and questioned specimens to a separate well of the spot plate. Use the two questioned specimens and the five known specimens supplied with the kit as well as table salt you supply as the sixth known. Use the outer wells for the known specimens and inner wells for the questioned specimens. Record the well numbers and their contents in your lab notebook.
3. Place the spot plate under a strong light, note the start time, and then transfer two drops of Marquis reagent to the first known well. Record the initial color in the well in your lab notebook and observe and record any color transitions that occur over the next 60 seconds. After one minute has elapsed, record the “final” color present in the well in your lab notebook.
4. Repeat step 3 for each other well that contains a known or questioned specimen. At this point, you may be able to tentatively identify one or both of the questioned specimens as being consistent with one or more of the known specimens.
5. Carefully place the populated spot plate in the sink and flood it gently with tap water from a beaker or similar container to rinse away the contents of the populated wells. Once the contents of all wells have been diluted and rinsed away, wash the spot plate thoroughly under running tap water and dry it completely. Make sure the sink is also rinsed thoroughly. 6. Repeat steps 1 through 5 using Mandelin reagent.
7. Repeat steps 1 through 5 using Scott reagent.
8. Could you identify the questioned specimens?
Scott reagent
Dissolve 0.5 g of reagent-grade cobalt thiocyanate in 25 mL of distilled or deionized water.
Mandelin reagent
Dissolve 0.1 g of reagent-grade ammonium metavanadate in 10 mL of reagent-grade concentrated (96% to 98%) sulfuric acid.
Marquis reagent
Add 10 mL of reagent-grade concentrated sulfuric acid to 0.25 mL of reagent-grade 37% formaldehyde solution (formalin).
| Compound | Scott reagent | Mandelin reagent | Marquis reagent |
| Paracetamol | |||
| Aspirin | |||
| Ibuprofen | |||
| diphenhydramine | |||
| chlorpheniramine | |||
| Unknown |